Changing Screen Display Why 800 x 600 Netscape & Explorer Toolbars Windows 95 Windows 95 by right click method Windows 3.x Macintosh |
|
Your screen setup directly effects your viewing enjoyment of the web. It determines how much you can fit onto your screen at once without having to horizontally or vertically scroll. The higher the resolution the more you can fit onto your screen. As screen resolution rises individual elements (such as icons) seem to shrink relative to lower resolutions. You can change the resolution of your monitor (screen) so that you can view more of web pages? Your screen resolution should actually be at 800x600 because most sites are designed for that resolution. 800x600 is the best screen resolution for apparent font size and viewable area - especially for 15" screens. Most people purchase their computer with the resolution already set at 640 x 480 pixels. This results in a lot of wasted screen space and poor quality graphics. If you insist on allowing your monitor resolution to remain at 640x480 expect some of the pages to be too large for comfortable viewing. You will be required to scroll up and down, and sometimes left and right to see the entire page. Most up-to-date computers have the capability to resize the screen resolution. Some variables to consider are that these rules assume that you are viewing in a maximized window, with most of toolbars visible at the top of your viewing area. You may see a thin strip of white or gray at the bottom depending on your toolbar arrangement, but you shouldn't see a strip on the right. Netscape and Explorer toolbars take up a lot of screen real estate. If you do not require, and you do not, all the toolbars you can remove them from the screen. For Netscape you select the top "Options" pop-up menu; for Internet Explorer 3.0 you select the top "Edit" pop-up menu and then "Options;" for Internet Explorer 4.0 you select the top "Edit" pop-up menu then "Preferences," then "Web Browser." Select the toolbars you need and turn off the others. Optimize your monitor/ screen settings. |
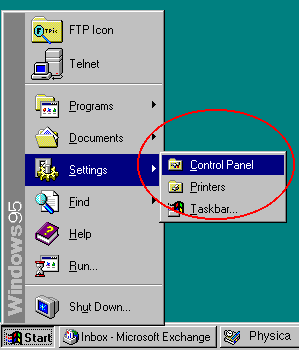
Windows 95 Windows 95, makes re-sizing the screen resolution quick and easy and it lets you do this on the fly, without re-booting and losing your internet connection. Where to Start Like many other system-related tasks, you’ll find the menu item for this function under the start button located on the lower left of the screen
Press the Start button on the lower left of the screen and bring up the Settings menu. From there, drag your cursor to the right over the small black arrow to display the submenu with the Control Panel item. as shown in Figure 2. Click on this to see the Control Panel.
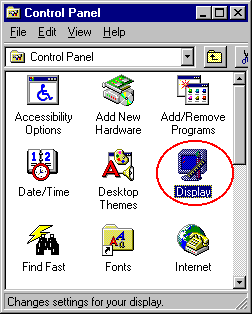
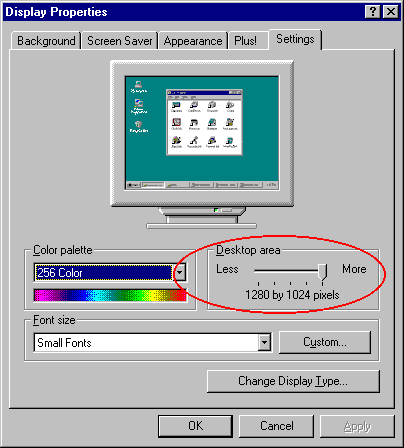
Once the Control Panel is open, click on the icon labeled Display to see the Display Properties dialog box as shown in Figure 3. Then click the Settings tab along the top.
What’s Under the Settings Tab There are only a few things you can select and set on this screen, which makes it simple to understand and use. As you can see in Figure 3, there is a slider bar that you can grab move to the left or right to adjust the screen resolution to 800x600. As you do this, you will also see the image in the monitor change to give you an idea of the results to expect. Applying the New Settings Now, click on the OK button or on the Apply button and see what happens. Before your very eyes, Windows 95 will reset the screen resolution without rebooting. During this process, you see the following message:
After this, all you have to do is click the OK button which appears next and your done. The only problem is that Windows 95 will move around the stuff on your desktop so that everything is visible. If you are fussy about where things are, you will probably not like this feature, but if you are a relative novice with Windows 95 or are just laid back about things, you’ll enjoy the convenience of this feature. |
Windows 95 1. Using the button on the right-hand side of your mouse, click (called a right-click) on the Windows 95 desktop. A pop-up menu will appear. 2. Look at the bottom of the menu and left-click (normal click) on the "Properties" selection. 3. Left-click on the "Settings" tab. 4. On the right side of the window, just under the picture of a monitor, is a selection called "Desktop Area." Drag the little slider bar towards the right to increase the resolution of your monitor. It will go from "640 x 480" to "800 x 600" to "1024 x768" and maybe as high as "1280 x 1024" if your monitor supports it. 5. I have found that a comfortable setting is "800 x 600" with the "Small Fonts" choice or "1024 x 768" with the "Large Fonts" choice. If you don't change the color pallet then your screen will resize without restarting your computer, and you will not have to re-establish your Internet Connection. |
Win 3.1 Note: You will have to restart Windows or your system if you change settings by using Setup. For this reason, it is a good idea to close all your running applications before you use Setup. 1. Double-click to Program Manager. 2. Double-click to Main. 3. Double-click Windows Setup. 4. Make sure that your hardware is set up to match the setting you are changing. Check your hardware documentation. 5. From the Options menu, choose Change System Settings. 6. Click the arrow at the right of the setting that you want to change to open the list. Or press ALT+DOWN ARROW. Each list displays drivers or devices supported for that setting. Make sure your hardware is listed. Use the scroll bar or arrow keys to see more of the list. 7. Select the setting that you want. 800x600x256 Driver that matches your video card 8. Choose the OK button. Setup may prompt you to insert a Windows disk into drive A. If it does, put the disk in drive A and close the drive door, or type the path of the appropriate device-driver file. Then choose the OK button. 9. From the Options menu, choose Exit. 10. Make sure there are no disks in any floppy disk drive, and then choose the Reboot button (if it appears) to restart your system. (After restarting your system, you can start Windows by typing win at the MS-DOS prompt.) Or choose the Restart Windows button. The next time you start Windows, the new settings will be in effect. |
Macintosh 1. From the Apple icon at the top left of the screen select Control Panels. 2. Select Monitor and Sounds. 3. Select monitor icon at top. 4. Under resolution select 832x 624 5. Close Monitor and Sounds box by mouse clicking the little box in the upper left of screen. Changing Screen Display with Control Strip 1. Mouse click the Control Strip on the lower left of screen. 2. Mouse click and hold monitor icon to open. 3. Select 832x 624 |


